

Planning
Planning
Marking Inferior Alveolar Nerve
From the Nerve Wizard choose whether you want to detect both nerves or just one side and then press on Detect and the nerve will be automatically segmented .You still can edit the nerve manually by adding points by the mouse and moving them. The diameter of the nerve is automatically adjusted to 2mm, you can change this from the nerve card.
Implant library
From the Settings menu, choose libraries and download the implant systems you prefer.
Each implant library contains the different types of that system.
Adding virtual restoration
From the toolbar, select add virtual restoration. Select the tooth you will work on, and it will be automatically positioned. You can edit its position manually by moving and rotating it on both 2D curs and 3D model. You can check assign implant and choose your implant in the same step.
Adding Implants
From the toolbar, click on Add Implants. Choose your implant system and implant type. This will show you different implant sizes to choose from. Once you select the implant, it will be automatically placed in its position and named according to the tooth number if you check assign to tooth and selected the tooth you’re working on.
You can check and edit the implant position in different 2D cuts and all-around centric and tangential lines.
Adding Abutments
While adding implants, assigning a generic abutment to that implant will be automatically chosen. Then you can edit the abutment and change its angulation and dimensions from the abutment card. You can also choose to use a vendor abutment by clicking on the implant card and choosing add abutment.
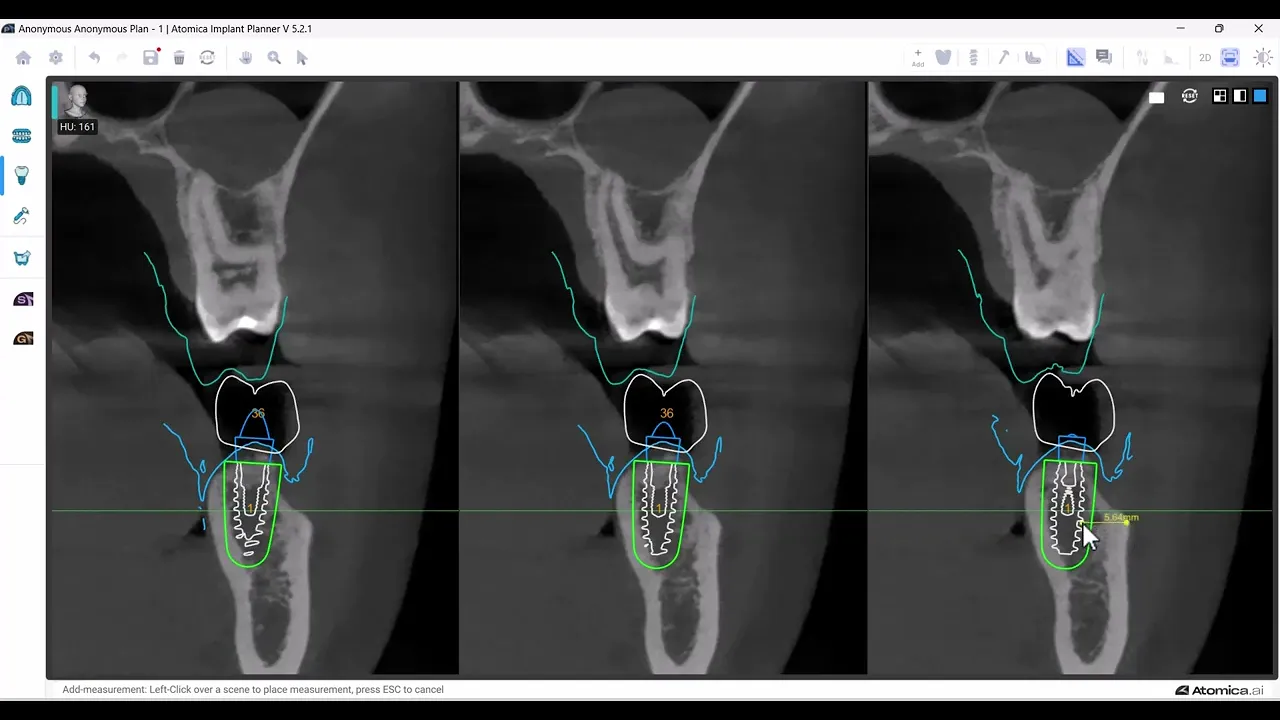
Measuring tools
Using the measurement tool, measure the distance you want on any 2D view except the panoramic view. When you click the measurement tool, the cursor will be changed to a ruler with a cross shape. Click the first point to start measuring, then click the second point to calculate the measurement. The distance between the two points will be measured and shown beside the line.
When planning multiple implants, you can measure the angle between them. Select the first one, then hold the control button and select the other. Click the measure angle button, and the measurement will instantly appear on the 3d view.
Paralleling Implants
To make a parallel relation between multiple implants, select the implant you want to preserve its angulation, then hold on control button and select the other, then click make parallel button, and it will be automatically adjusted after adjusting your implant position.
Adding Reduction plane
Fine-tune multiple implant levels, especially when bone reduction is part of your plan. Click on the reduction plane icon and adjust it in both 2D and 3D by moving and rotating the plane. Then change the implants positions according to it.
Adding Comments
From the toolbar, click on the add annotations button. The cursor will be changed so that you can choose the location of the comment. Write your comment and click save. You can head to the comment location from the annotation card by clicking on go to.
Show and Hide objects
Through all planning phases, you can hide or show each object individually by deactivating\activating its icon.
Clipping 3D model
Select the clipping tool, mark the direction of clipping, and use the mouse scroll to start clipping. You can choose whether to clip objects or not. Click on the reverse button to reverse the clipping direction.
Adding fixation Pins
Click on Add fixation Pin choose the size you want, and place it on the 2D cross sections. You can move it and rotate it till you adjust the position.
Marking Inferior Alveolar Nerve
From the Nerve Wizard choose whether you want to detect both nerves or just one side and then press on Detect and the nerve will be automatically segmented .You still can edit the nerve manually by adding points by the mouse and moving them. The diameter of the nerve is automatically adjusted to 2mm, you can change this from the nerve card.
Implant library
From the Settings menu, choose libraries and download the implant systems you prefer.
Each implant library contains the different types of that system.
Adding virtual restoration
From the toolbar, select add virtual restoration. Select the tooth you will work on, and it will be automatically positioned. You can edit its position manually by moving and rotating it on both 2D curs and 3D model. You can check assign implant and choose your implant in the same step.
Adding Implants
From the toolbar, click on Add Implants. Choose your implant system and implant type. This will show you different implant sizes to choose from. Once you select the implant, it will be automatically placed in its position and named according to the tooth number if you check assign to tooth and selected the tooth you’re working on.
You can check and edit the implant position in different 2D cuts and all-around centric and tangential lines.
Adding Abutments
While adding implants, assigning a generic abutment to that implant will be automatically chosen. Then you can edit the abutment and change its angulation and dimensions from the abutment card. You can also choose to use a vendor abutment by clicking on the implant card and choosing add abutment.
Measuring tools
Using the measurement tool, measure the distance you want on any 2D view except the panoramic view. When you click the measurement tool, the cursor will be changed to a ruler with a cross shape. Click the first point to start measuring, then click the second point to calculate the measurement. The distance between the two points will be measured and shown beside the line.
When planning multiple implants, you can measure the angle between them. Select the first one, then hold the control button and select the other. Click the measure angle button, and the measurement will instantly appear on the 3d view.
Paralleling Implants
To make a parallel relation between multiple implants, select the implant you want to preserve its angulation, then hold on control button and select the other, then click make parallel button, and it will be automatically adjusted after adjusting your implant position.
Adding Reduction plane
Fine-tune multiple implant levels, especially when bone reduction is part of your plan. Click on the reduction plane icon and adjust it in both 2D and 3D by moving and rotating the plane. Then change the implants positions according to it.
Adding Comments
From the toolbar, click on the add annotations button. The cursor will be changed so that you can choose the location of the comment. Write your comment and click save. You can head to the comment location from the annotation card by clicking on go to.
Show and Hide objects
Through all planning phases, you can hide or show each object individually by deactivating\activating its icon.
Clipping 3D model
Select the clipping tool, mark the direction of clipping, and use the mouse scroll to start clipping. You can choose whether to clip objects or not. Click on the reverse button to reverse the clipping direction.
Adding fixation Pins
Click on Add fixation Pin choose the size you want, and place it on the 2D cross sections. You can move it and rotate it till you adjust the position.