Implant Planner

Guide Design

Planner Software Interface
Planner Software Interface
Planner Software Interface
Adding New Case
The first time you use the software, you can only use the New case tap.
After that, you can choose between starting a new case and opening an existing “Atom” project.
The file format should be either DICOM or DCM.
Browse for the location of your patient's DICOMs and then select any of the DICOM files, and all the files will be loaded automatically.
NOTE: If it doesn’t load, make sure that all DCM files “Slices” are in the folder and in sequence e.g.: slice1 >slice 2 >slice 3
After loading the patient’s file, you must save it as an “Atom” project before starting.
Do this by Filling patient’s data and browsing to the location you want to save your project in. It will automatically suggest the location of the original DICOM.
You can also have an overview of the case here, where it appears as a 3D-constructed model with all DICOM info listed aside from it.
You can also find all the patient and CT data here, with an alarming message if the acquisition date of the CT exceeds 6 months.
To move\rotate\zoom the 3D model, use the mouse or the keyboard as instructed in the Guiding bar at the bottom.
This bar will show at all phases of planning. You can always use it as your instant guide.
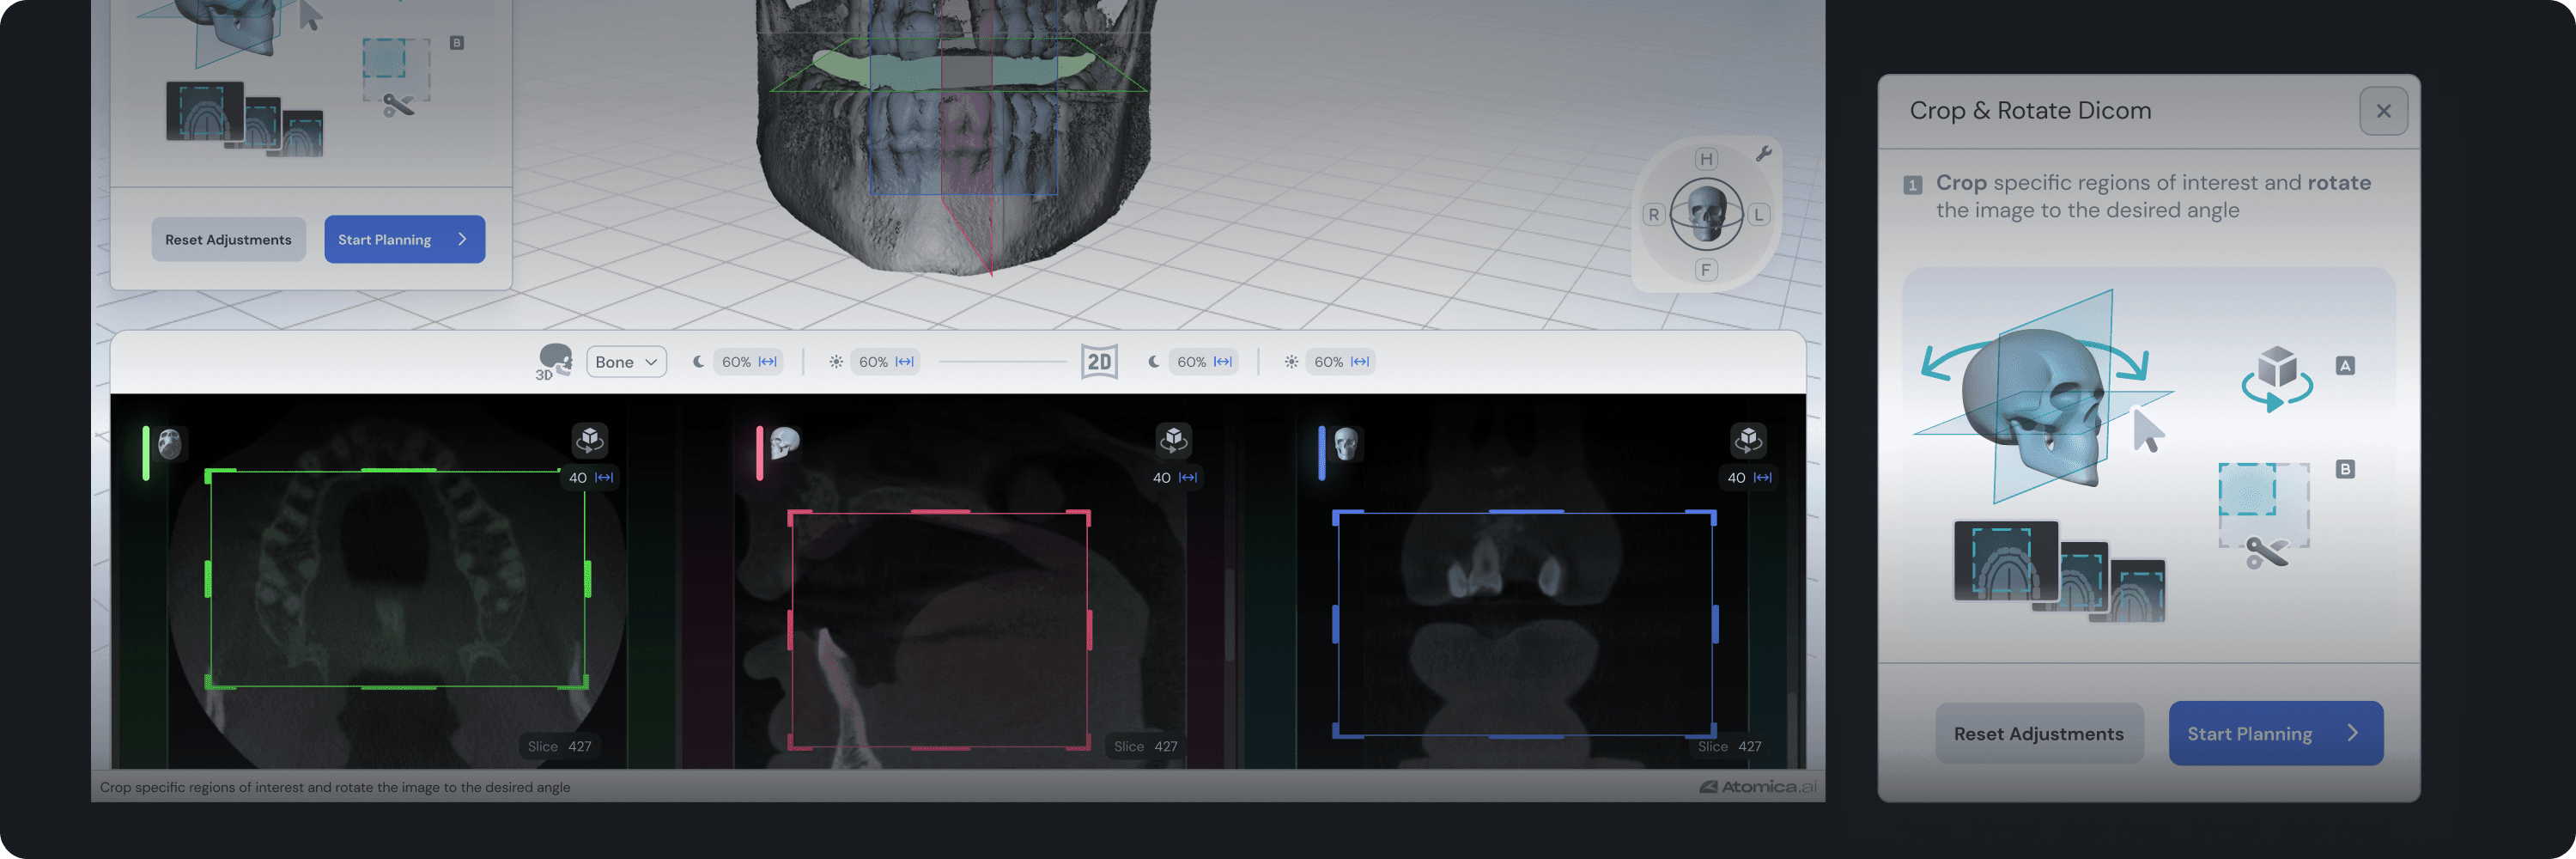
Adjusting Dicom
Press Adjust Dicom This will lead you to where you can adjust the views before planning.
Crop the area of interest by moving lines of the square
Rotate alignment using the rotation button
You can reset all changes using the reset button or using the keyboard as shown in the guiding bar at the bottom or just click
Reset AdjustmentsAfter Finishing, click
Start Planning
Changing Teeth Numbering System
From settings, select Preferences and select your preferred teeth numbering system.
Changing Shortcuts
From settings, select shortcuts and choose your preferred sets of shortcuts

Adding New Case
The first time you use the software, you can only use the New case tap.
After that, you can choose between starting a new case and opening an existing “Atom” project.
The file format should be either DICOM or DCM.
Browse for the location of your patient's DICOMs and then select any of the DICOM files, and all the files will be loaded automatically.
NOTE: If it doesn’t load, make sure that all DCM files “Slices” are in the folder and in sequence e.g.: slice1 >slice 2 >slice 3
After loading the patient’s file, you must save it as an “Atom” project before starting.
Do this by Filling patient’s data and browsing to the location you want to save your project in. It will automatically suggest the location of the original DICOM.
You can also have an overview of the case here, where it appears as a 3D-constructed model with all DICOM info listed aside from it.
You can also find all the patient and CT data here, with an alarming message if the acquisition date of the CT exceeds 6 months.
To move\rotate\zoom the 3D model, use the mouse or the keyboard as instructed in the Guiding bar at the bottom.
This bar will show at all phases of planning. You can always use it as your instant guide.
Adjusting Dicom
Press Adjust Dicom This will lead you to where you can adjust the views before planning.
Crop the area of interest by moving lines of the square
Rotate alignment using the rotation button
You can reset all changes using the reset button or using the keyboard as shown in the guiding bar at the bottom or just click
Reset AdjustmentsAfter Finishing, click
Start Planning
Changing Teeth Numbering System
From settings, select Preferences and select your preferred teeth numbering system.
Changing Shortcuts
From settings, select shortcuts and choose your preferred sets of shortcuts
Continue Learning